2015年4月30日 星期四

Access create search Form

This Access tutorial explains how to create a search Form with multiple criteria.


You may also want to read:


Access DoCmd.OpenForm Method to open Access Form


Access Combo Box value depends on another Combo Box


Return Access Form input to Access Report or Form or Query


Access create search Form with multiple criteria


Sometimes you need to create a search Form where users can select specific criteria. The simplest solution is to directly filter data for each field like using AutoFilter in Excel, but this is not elegant at all. A better way to do this is for user to choose from dropdown box of different levels, value of one dropdown box depends on the value of another dropdown box.


For example, in the first dropdown box, users choose department A, and then in the second dropdown box,  users can view a list of person of department A.


This tutorial will show you how to do this.


Create a result Form


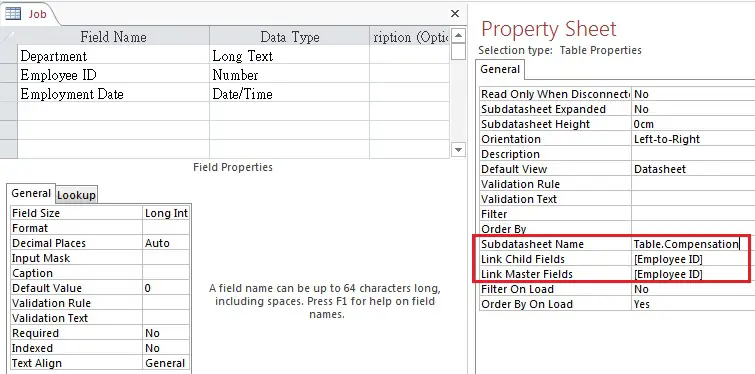
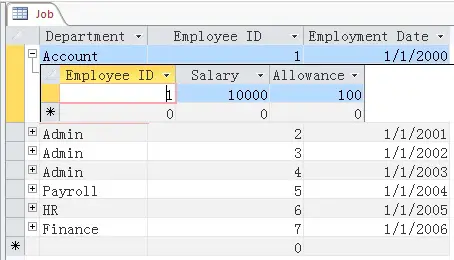
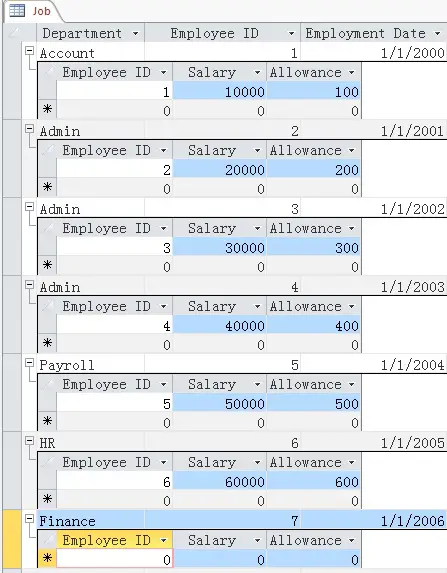
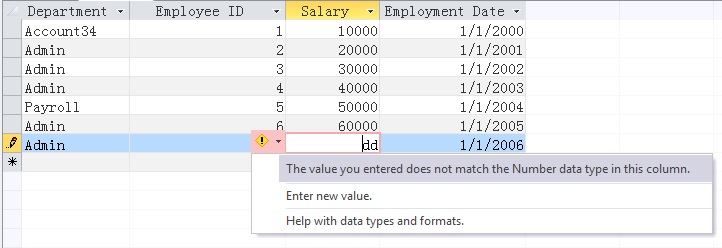
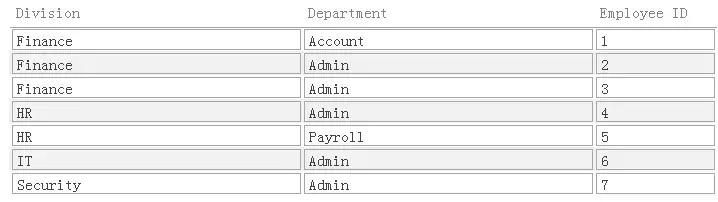
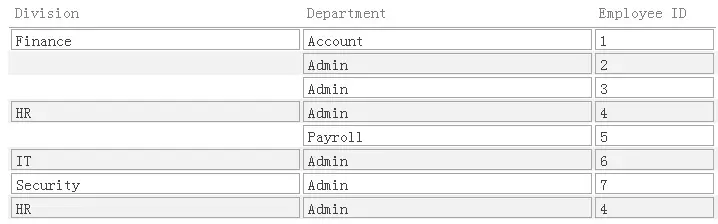
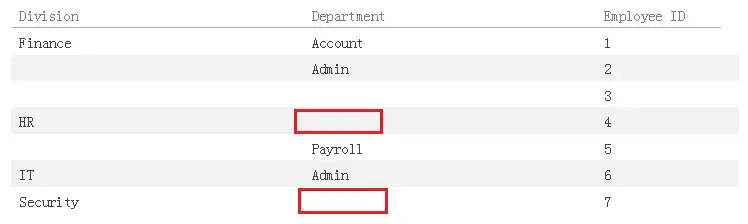
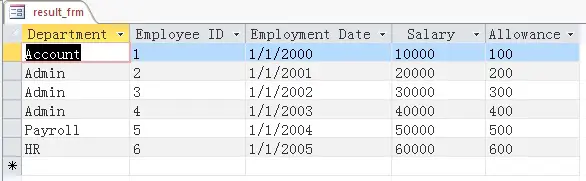
Assume that we have a Query as below. Our goal is to allow users to select department to show employee information, or select department + employee ID.


We are going to make a “result Form” that shows the search result.


Query1
DepartmentEmployee IDEmployment DateSalaryAllowance
Account11/1/200010000100
Admin21/1/200120000200
Admin31/1/200230000300
Admin41/1/200340000400
Payroll51/1/200450000500
HR61/1/200560000600

Click on the Query and the under Create tab, select More Forms > DataSheet


access_search_form


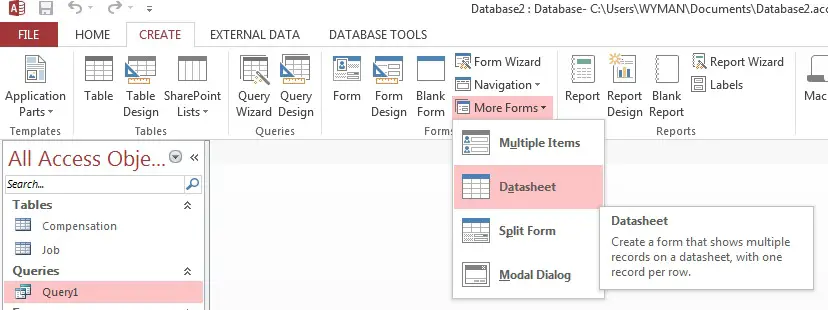
Now save the Form as result_frm


access_search_form_04


In this example, I want to return all fields of Query1 in Result Form. I choose DataSheet because each record can be displayed in one row with horizontal scroll bar. I don’t prefer to use Continuous Form or Single Form because each record is displayed in several rows.


Create a Search Form


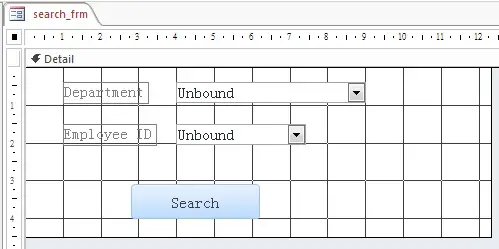
Create a blank Form and then add two Combo Boxes (Combo_Dept, Combo_EmpID) and one button (search_btn) as shown below.


access_search_form_05


1) Click on Combo_Dept, in the Row Source property, type


SELECT DISTINCT Department FROM Query1;

Row Source is what you can select in the ComboBox.


2) Click on Combo_EmpID, in the Row Source property, type


SELECT [Employee ID] FROM Query1 WHERE [Department]=[forms]![search_frm]![Combo_Dept];

3) Select Combo_Dept, select After Update Event and build the below Procedure


Private Sub Combo_Dept_AfterUpdate()
    Me.Combo_EmpID = Null
    Me.Combo_EmpID.Requery
End Sub

As you select a Department, Combo_EmpID is reset to Null and then rerun the query


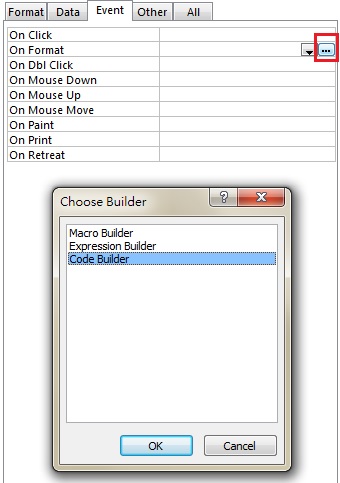
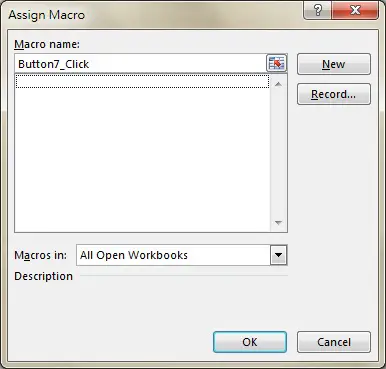
4) Right Click on search_btn and then choose Build Event


Private Sub search_btn_Click()
    If IsNull(Me.Combo_EmpID) Then
        searchCriteria = "[Department]='" & Me.Combo_Dept & "'"
        searchSQL = "Select * FROM Query1 where " & searchCriteria
    Else
        searchCriteria = "[Department]='" & Me.Combo_Dept & "' AND [Employee ID] =" & Me.Combo_EmpID
        searchSQL = "Select * FROM Query1 where " & searchCriteria
    End If
    DoCmd.OpenForm "result_frm", 3, searchSQL
End Sub

Now you have successfully created a simple search Form. After you have selected criteria in Search Form, once you click the search button, the Result Form will pop up and displays the result.


Outbound References


https://msdn.microsoft.com/en-us/library/office/ff820845.aspx?f=255&MSPPError=-2147217396


Access create search Form

2015年4月28日 星期二

Access Table add subdatasheet

This Access tutorial explains how to add subdatasheet in Access Table.


You may also want to read:


Access Table Data Validation Property to validate data


Access Table add subdatasheet


When you have more than one Access Table, you can build a relationship between them so that when you view one Table, you can also view fields of another Table.


This tutorial explains how to build the relationship in Table Property Sheet.


Example – Access Table add subdatasheet


Assume that you have two Tables, they have a common Field [Employee ID]


Job – records employees’ job related data


Compensation – records employees’ compensation


Job
DepartmentEmployee IDEmployment Date
Account11/1/2000
Admin21/1/2001
Admin31/1/2002
Admin41/1/2003
Payroll51/1/2004
HR61/1/2005
Finance71/1/2006


Compensation
Employee IDSalaryAllowance
110000100
220000200
330000300
440000400
550000500
660000600

Go to Design View of Job Table.


As you join two tables, you need a key for each table. Link Master Fields is the key in current table, while Link Child Fields is the key in linked table.


In the Table Properties Sheet (on the right hand side), select the Compensation Table as the Subdatasheet Name, and then type [Emplyee ID] for both Link Child Fields and Link Master Fields.


access_subdatasheet


Open Job Table in DataSheet View. Now you can see a plus sign on each employee. Click on the sign to expand the Compensation Fields from Compensation Table.


access_subdatasheet_02


In the Property Sheet of Design View of Job Table, there is a Property called Subdatasheet Expanded. Set to Yes to automatically expand linked table fields.


access_subdatasheet_03


There is an Employee ID 7 in Job Table, but there is no Employee ID 7  in Compensation Table. As you can see in the above picture, when they key fails to join, the Compensation Fields show 0.


You should be very careful about this, because when you Left Join two Tables in Query, the non-matched data shows Null (blank) not 0.


Outbound References


https://support.office.com/en-us/article/Add-a-subdatasheet-900d1d30-5ea2-4e47-80a7-ddcb87a53d14?CorrelationId=1b9ef07b-2de6-4dcb-9ab6-57d8e9469965&ui=en-US&rs=en-US&ad=US


Access Table add subdatasheet

Access Table Data Validation Property to validate data

This Access tutorial explains how to validate data type and data value in Access Table using Data Validation Property.


Access Table Data Validation


When you create a Table, you can control the data type of the Field in Design View of the Table.


Assume that you have created a table of the following Fields.


Field NameData Type
DepartmentLong Text
Employee IDNumber
SalaryNumber
Employment DateDate/Time

When you type a Text in Salary, you will be prompted an error, and you cannot save the record. You will not be able to save the value even if you are using Query to input the data.


access_data_validation


This kind of validation is for Data Type only, so what about the value of the data?


Switch to Design View of the Table.


Select Salary, and change the Validation Rule to >0 (meaning user must input a value in Salary >0)


access_data_validation_02


Switch to DataSheet View of the Table. Now change a salary value to -1, the following error message will pop up.


access_data_validation_03


Instead of showing the above message, you can customize an error message in the Validation Text right under the Validation Rule.


Other examples – Access Table Data Validation


I refer to Microsoft support and find some examples below.


Validation ruleDescription
NumberBETWEEN 0 AND 1Enter a value with a percent sign. (For use with a field that stores number values as percentages).
Date>=#01/01/2007# AND <#01/01/2008#Date must occur in 2007.
Date<Date()Birth date cannot be in the future.
Date[EndDate]>=[StartDate]Enter an ending date on or after the start date.
TextM Or FEnter M for male or F for female.
TextLIKE “[A-Z]*@[A-Z].com” OR “[A-Z]*@[A-Z].net” OR “[A-Z]*@[A-Z].org”Enter a valid .com, .net, or .org e-mail address.

Operators for Access Table Data Validation


I refer to Microsoft support and find a list of Operators that can be used in Data Validation.


OperatorFunctionExample
NOTTests for converse values. Use before any comparison operator except IS NOT NULL.NOT > 10 (the same as <=10).
INTests for values equal to existing members in a list. Comparison value must be a comma-separated list enclosed in parentheses.IN (” Tokyo”,”Paris”,”Moscow “)
BETWEENTests for a range of values. You must use two comparison values — low and high — and you must separate those values with the AND separator.BETWEEN 100 AND 1000 (the same as >=100 AND <=1000)
LIKEMatches pattern strings in Text and Memo fields.LIKE “Geo*”
IS NOT NULLForces users to enter values in the field. This is the same as setting the Required field property to Yes. However, when you enable the Required property and a user fails to enter a value, Access displays a somewhat unfriendly error message. Typically, your database is easier to use if you use IS NOT NULL and enter a friendly message in the Validation Text property.IS NOT NULL
ANDSpecifies that all the data that you enter must be true or fall within limits that you specify.>= #01/01/2007# AND <=#03/06/2008#

Note   You can also use AND to combine validation rules. For example: NOT “UK” AND LIKE “U*”.
ORSpecifies that one or more pieces of data can be true.January OR February
<Less than.
<=Less than or equal to.
>Greater than.
>=Greater than or equal to.
=Equal to.
<>Not equal to.


Access Table Data Validation Property to validate data

Access Report Hide Duplicates Property

This Access tutorial explains the Hide Duplicates property in Access Report.


Access Report Hide Duplicates


Access Field has a Property called “Hide Duplicates”, which removes all consecutive duplicates in a column.


Assume we have the following Report.


access_report_hide_data


Switch to Design View, click on Division text box in Detail section.


In the Property Sheet, find the Hide Duplicates Property, set to Yes (default is No)


access_report_reset_page_number_09


Now switch to Print Preview, you will find Division duplicates are removed.


access_report_hide_data_02


If we add one more HR data at the bottom, you will see HR at the bottom is not removed, it is because the HR data are not consecutively repeated.


Therefore it is very important that you have to sort the data first before applying Hide Duplicates.


access_report_hide_data_03


Using the above result, also change Hide Duplicates property of Department Text Box to Yes. We assume that Department is a branch of Division with many to one relationship.


As you can see in the below result, some Departments are unexpectedly missing. The Admin Department of HR and IT are gone. This is because Hide Duplicates property would not consider the relationship between Division and Department, unlike Pivot Table.


access_report_hide_data_04


Conclusion of Access Hide Duplicates Property


Hide Duplicates Property is a very rough tool to remove duplicates, it may not provide result as you expected. Some people suggest to use isVisible Property in Department Text Box Expression to check the visibility of Division Text Box in order to avoid Null value in the first Department value of each Division.


For example,  =IIF(Division.isVisible,Department,Null”)


This solution only works if you only have one Department for each Division, this still has not resolved the issue of the above example to simulate the tabular format of Excel Pivot Table.


The only solution to remove duplicates is to use Group at the bottom of Design View to tell Excel the level of grouping.


access_report_hide_data_05


As you group Division and Department as above, you will be using Group Header/Footer Sections to show unique value, which is slightly different from the conventional tabular format.


Outbound References


https://support.office.com/en-us/article/Find-hide-or-eliminate-duplicate-data-3CC805A2-2A13-4439-B0D3-6B23C7D60FBB


Access Report Hide Duplicates Property

2015年4月27日 星期一

Access Report Section Property

This Access tutorial explains how to use Access Report Section Property to control Report Section such as Page Header, Footer.


Access Report Section Property


In Access Report VBA, you can directly access the Controls in the Report, it is also possible to access the Report Sections using Report Section Property, such as Page Header, Group Header, Page Footer, etc. This is especially useful to hide the whole Section.


Syntax of Report Section Property


Me.Section(Index)


IndexConstantDescription
0acDetailReport detail section
1acHeaderReport header section
2acFooterReport footer section
3acPageHeaderReport page header section
4acPageFooterReport page footer section
5acGroupLevel1HeaderGroup-level 1 header section
6acGroupLevel1FooterGroup-level 1 footer section
7acGroupLevel2HeaderGroup-level 2 header section
8acGroupLevel2FooterGroup-level 2 footer section

Example of Access Report Section Property


To hide Group Header Section in an Event


Me.Section(5).Visible = False

You may also read my another example below


Access Report page break by Group and add blank page


Outbound References


https://msdn.microsoft.com/en-us/library/office/ff192668.aspx


Access Report Section Property

Access Report reset total page number and insert blank page

This Access tutorial explains how to reset page number and reset total page number for each group in Access Report.


You may also want to read:


Access Report page break by Group and add blank page


Access Report Section Property


Access Report reset page number and reset total page number


When you have a Report that has different grouping, you may want to print out as separate reports with page number reset.


In the previous post, I have demonstrated how to print out separate reports for different grouping by adding a page break when grouping end page is odd number.


In this post, I will show how to reset page number based on the result of the last post.


Now lets quickly recap what has been done in the last post. In the last post, I page break a report by group (Department) using Force New Page property, and then use VBA to conditionally add a blank page if the grouping end page is odd number.


In the last example, Finance Department are in Page 1 and 2. Since the last page is even number, PageBreak49 is invisible (no page break).


access_report_page_break_08


access_report_page_break_09


For HR Department, since the last page is odd number, PageBreak49 becomes visible (add page break).


access_report_page_break_10


access_report_page_break_11


Reset page number to 1 for each group


Assume that we only need Page x instead of Page x of 8 (we will discuss this in the next part).


Switch to the Design View


access_report_page_break_14


In the Page Footer, change the Text box to  =[Page] from [Page] of [Pages]


access_report_page_break_12


Click on Dept Header, in the Property, click on Event > On Format > Code Builder, then insert then below code to reset page for each group header


 Page = 1

Then switch to Print Preview and you will find that page number is reset to 1 for each Department.


access_report_reset_page_number


access_report_reset_page_number_02


access_report_reset_page_number_03


Reset total Pages for each group


In this section, I will use the method suggested in this article to reset total page number + insert blank page + remove blank page header


Now forget all about the above method an go back to the Design View of the last post.


access_report_page_break_14


1) In Page Footer, set the Visible property to No for the page Text Box. We need the Page and Pages value in order for the total pages Macro to work, but it does not have to be visible.


2) In Page Footer, create a Text Box called ctlGrpPages with no value, which is used to display the new [Page] of [Pages]


access_report_reset_page_number_08


4) Select Page Footer, in the Property, select Event > On Format > Code Builder, copy and paste the below codes at Module level. Since Page Footer Section Procedure is rerun for every page, we need to reuse those variables.


Dim GrpArrayPage()  ‘Array that stores new page number of each page

Dim GrpArrayPages() ‘Array that stores new total page number of each page

Dim GrpNameCurrent As Variant ‘Group value of the page

Dim GrpNamePrevious As Variant ‘Group value of last page

Dim GrpPage As Integer ‘page number to be displayed in Text Box

Dim GrpPages As Integer ‘total page number to be displayed in Text Box

5) Paste the below codes in Page Footer Format Event


Private Sub PageFooterSection_Format(Cancel As Integer, FormatCount As Integer)
    ‘The first visit of Access to determine the total pages

If Me.Pages = 0 Then

ReDim Preserve GrpArrayPage(Me.Page + 1)

ReDim Preserve GrpArrayPages(Me.Page + 1)

GrpNameCurrent = Me!TextDept ‘change to your group text box name
        ‘If group is not changed

If GrpNameCurrent = GrpNamePrevious Then

GrpArrayPage(Me.Page) = GrpArrayPage(Me.Page – 1) + 1

GrpPages = GrpArrayPage(Me.Page)

For i = Me.Page – ((GrpPages) – 1) To Me.Page

GrpArrayPages(i) = GrpPages

Next i
        ‘If group is changed

Else

Me.ReportHeader.Visible = True

GrpPage = 1

GrpArrayPage(Me.Page) = GrpPage

GrpArrayPages(Me.Page) = GrpPage

End If
    ‘The second visit of Access to assign Page and Pages

Else

Me!ctlGrpPages = “Page ” & GrpArrayPage(Me.Page) & ” of ” & GrpArrayPages(Me.Page)

End If

GrpNamePrevious = GrpNameCurrent

End Sub

Switch to Print Preview, now the Group Finance and HR has their own total page number.


access_report_reset_page_number_04


access_report_reset_page_number_05


access_report_reset_page_number_06


access_report_reset_page_number_07


Click here to download examples


Access Report reset total page number and insert blank page

2015年4月25日 星期六

Access Report page break by Group and add blank page

This Access tutorial explains how to add page break by Group in Access Report and add blank page if last page is odd number.


Access Report page break by Group


When we create Access Report which has different grouping, we may want to start a new page for each group.


Assume that we have the following Report grouped by Department and Section. How do we start a new page for each Department?


access_report_page_break


First, go to the Design View of the Report. As you can see at the bottom, it is grouped by Department and then grouped by Section.


access_report_page_break_02


Click on Dept Header, in the Property page, set the Force New Page property to Before Section


access_report_page_break_03


Alternative, click on the Dept Footer, in the Property page, set the Force New Page property to After Section. Do not use After Section in Access 2010 because it is bugged to give blank pages, use Before Section instead.


Now go to Print Preview and you will see Access starts a new page for each Department.


access_report_page_break_04


access_report_page_break_05


Access Report add blank page if last page is odd number


If we are going to distribute each report to each department, we cannot have page 1 for department A and page 2 for department B, instead you can print single side.


To print double side, if the end page of department A is odd page, we need to insert a blank page, so that we have department A in page 1, blank page 2, department B in page 3.


Now go to Design View, under Dept Footer, insert a Page Break Control, say PageBreak49.


access_report_page_break_06


Next, click on Depart Footer, in the Property, select Event > On Format > Code Builder


access_report_page_break_07


Insert the following code


If Me.Page Mod 2 = 0 Then
    Me!PageBreak49.Visible = False
Else
    Me!PageBreak49.Visible = True
End If

Go to Print Preview. Now Finance Department are in Page 1 and 2. Since the last page is even number, PageBreak49 is invisible (no page break).


access_report_page_break_08


access_report_page_break_09


For HR Department, since the last page is odd number, PageBreak49 becomes visible (add page break).


access_report_page_break_10


access_report_page_break_11


Outbound References


https://support.office.com/en-us/article/Insert-a-page-break-control-in-an-Access-report-86D2EA7D-7AA6-44F2-8507-23134A9A2E15


Access Report page break by Group and add blank page

Excel difference between Form Controls vs ActiveX Controls

This Excel tutorial explains difference between Form Controls vs ActiveX Controls for Excel worksheet.


Excel difference between Form Controls vs ActiveX Controls


There are two different kinds of Controls in Excel spreadsheet, both are very similar but we need to know the difference between them. UserForm also has its Control but it is not discussed in this topic.


In Excel 2013, to insert a Control in Excel spreadsheet, navigate to Developer > Insert , there are two groups of Controls available – Form Controls and ActiveX Controls.


formcontrols_activexcontrols


If you cannot find the Developer tab, navigate to File > Options > Customize Ribbon > check the Developer box.


Form Controls vs ActiveX Controls – Appearance


As seen in the picture above, both Form Controls and ActiveX Controls have common Controls in different order, but the appearance is slightly different.


formcontrols_activexcontrols_04


Form Controls vs ActiveX Controls – Extensions


ActiveX Controls has a button called “More Controls”, when you click on it, you will see 100+ other available Controls.


formcontrols_activexcontrols_05


ActiveX Controls are loaded from DLLs, you can extend the functionality using “Register Custom” under More Controls.


While ActiveX is a product of Microsoft,  it cannot be run in Mac computer. If you want to run on Mac, make sure you use Form Controls which do not contain any VBA.


Form Controls vs ActiveX Controls – Event


Now insert a Button from Form Controls and a Button from ActiveX Controls.


When you drag a Button from Form Controls, there is a pop up message asking you to assign a Macro to the Button. You need to create a Macro in Module in advance for selection.


formcontrols_activexcontrols_02


When you drag a Button from ActiveX Controls, you don’t need to assign a Macro. Instead, you can double click on the button and you will enter into VBE where a button click event is created under the current worksheet. The below example shows the Click Event of a command button, you can also select other Events available.


formcontrols_activexcontrols_03


Other than Button, all other Form Controls refer to the Macro that you create in Module, while ActiveX Controls have their own Properties and Event.


Form Controls vs ActiveX Controls – Formatting


ActiveX Controls have Properties setting but Form Controls don’t.


In Design Mode, right click on an ActiveX Control and select “Properties”. Below is the Properties of a Button.


formcontrols_activexcontrols_06


You can also right click on an ActiveX control and then select Format Control for basic formatting.


formcontrols_activexcontrols_07


To format a Form Control, you can only select Format Control. Although ActiveX Controls do not have Properties setting, some of the settings are present in Format Control instead.


formcontrols_activexcontrols_08


Outbound References


https://support.office.com/en-us/article/Overview-of-forms-form-controls-and-ActiveX-controls-on-a-worksheet-D101804A-0F84-43AD-8CB2-E19277B8E3FB


Excel difference between Form Controls vs ActiveX Controls

2015年4月21日 星期二

VBA Difference between Dim Set

This Access/Excel VBA tutorial shows the difference between Dim and Set keyword in variable declaration.


You may also want to read:


Excel VBA Option Explicit to force declaration of variables


Difference between ByRef ByVal


Function, Sub, Method, Property Differences


VBA Difference between Dim and Set


In VBA, we can always see the use of Dim and Set, but in some occasions we don’t.


Example 1:


Dim rng as Range 'Optional
Set rng = Range("A1")

Example 2:


Dim s as String 'Optional
s = "I am a String"

I will explain the difference between Dim and Set  in this tutorial.


VBA Dim keyword


Dim Keyword is to declare a variable and assign memory to it. In Example 1, we assign memory to “s” and then store value “I am a String” to it. Whenever s is called, we reference to the value of variable in the memory.


A variable type can be Byte, Boolean, Integer, Long, Currency, Single, Double, Date, String (for variable-length strings), String * length (for fixed-length strings), Object, Variant, a user-defined type, or an object type. Object has Property, such as color, font size, formats, while dates/string/number do not.


You can use New keyword with  Dim to declare an Object instead of using Set, for example


Dim X As New Worksheet

Instead of declaring every variables (which is annoying), you can simply use a variable without using Dim to declare, because Excel can guess the variable type for you and initialize the value as 0, therefore I marked “Optional” in Example 1 and 2.


You may not be able to do so if you have used Option Explicit keyword at Module level, which forces you to declare all variables.


From my experience, you don’t have to declare variables as long as your code is short and clean, but it is better to declare in very long code so that it is easier to debug.


VBA Set keyword


Set Keyword is to assigns an object reference to a variable or property.


Using Example 2 as an example,  we assign memory to a variable called “rng” to store Range Object, and then reference Object Range(“A1″) to rng. Whenever rng is called, we reference to the Object in the memory.


From Example 1 and Example 2, we see that we are not actually determining whether to use Dim or Set (or comparing difference between Dim and Set), because Dim is required for both examples to assign memory to a variable in the first step. The real question is when we need to use the Set keyword, which is used when we reference an Object to a variable.


It is a must to use the Set key word, otherwise we will receive the error


Run-time error ’91′:


Object variable or With block variable not set


dim_set


VBA Difference between Dim Set